•
18-minute read


This checklist describes all nuts and bolts of a technical site audit, from theory to practice.
You’ll learn what technical files exist, why SEO issues occur, and how to fix and prevent them in the future so that you're always safe from sudden ranking drops.
Along the way, I'll show some SEO audit tools, both popular and little-known, to conduct a technical website audit with no hassle.
The number of steps in your technical SEO checklist will depend on the goals and the type of sites you are going to examine. We aimed to make this checklist universal, covering all important steps of technical SEO audits.
1. Get access to site analytics and webmaster tools
To conduct a technical audit of your site, you’ll need analytics and webmaster tools, and it’s great if you already have them configured on your website. With Google Analytics, Google Search Console, Bing Webmaster Tools, and the like, you already have a large piece of data needed for a basic site check.
2. Check the domain safety
If you are auditing an existing website that has dropped from rankings, first and foremost, rule out a possibility that the domain is subject to any search engine sanctions.
To do this, consult Google Search Console. If your site has been penalized for black-hat link building, or it has been hacked, you will see a corresponding notice in the Security and Manual Actions tab of the Console. Make sure to address the warning you see in this tab before you proceed further with a technical audit of your site. If you need help, check our guide on how to handle manual and algo penalties.
If you are auditing a brand new site that is due to launch, make sure to check that your domain is not compromised. For details, consult our guides on how to choose expired domains, and how not to get trapped into the Google sandbox during a website launch.
Now that we’re done with preparatory work, let’s move on to the technical SEO audit of your website, step by step.
Generally speaking, there are two types of indexing issues. One is when a URL is not indexed even though it’s supposed to be. The other one is when a URL is indexed although it’s not supposed to be. So how to check the number of your site indexed URLs?
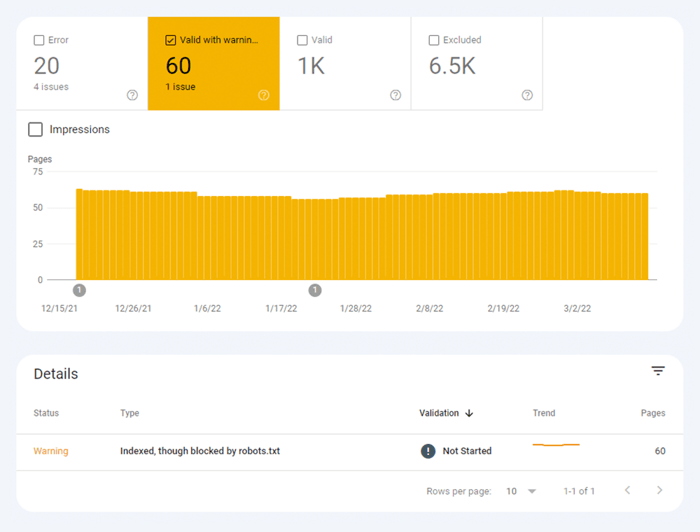
To see how much of your website has actually made it into the search index, check the Coverage report in Google Search Console. The report shows how many of your pages are currently indexed, how many are excluded, and what are some of the indexing issues on your website.


The first type of indexing issues is usually marked as an error. Indexing errors happen when you’ve asked Google to index a page, but it is blocked. For example, a page has been added to a sitemap, but is marked with the noindex tag or is blocked with robots.txt.


The other type of indexing issues is when the page is indexed, but Google isn’t certain it was supposed to be indexed. In Google Search Console, these pages are usually marked as Valid with warnings.

For an individual page, run the URL Inspection tool in Search Console to review how Google’s search bot sees it. Hit the respective tab or paste the full URL in the search bar at the top, and it will retrieve all information about the URL, the way it was scanned last time by the search bot.


Then, you can click on Test Live URL and see even more details about the page: the response code, HTML tags, the screenshot of the first screen, etc.
Another tool to monitor your indexing is WebSite Auditor. Launch the software and paste the URL of your website to create a new project and proceed to audit your site. Once the crawl is over, you will see all issues and warnings in the Site Structure module of WebSite Auditor. In the Domain Strength report, check out the number of pages indexed, not just in Google, but in other search engines as well.


In WebSite Auditor, you can customize your site scan, choosing a different search bot and specifying the crawl settings. In the SEO spider’s Project Preferences, define the search engine bot and a specific user agent. Choose what types of resources you want to examine during the crawl (or conversely skip from scanning). You can also instruct the crawler to audit subdomains and password-protected sites, ignore special URL parameters, and more.


Watch this detailed video walkthrough to learn how to set up your project and analyze websites.
Every time a user or a search bot sends a request to the server carrying the website data, the log file records an entry about it. This is the most correct and valid information about crawlers and visitors on your site, indexing errors, crawl budget wastes, temporary redirects, and more. Since it may be difficult to analyze log files manually, you’ll need a log file analyzer program.
Whichever tool you decide to use, the number of indexed pages should be close to the actual number of pages on your website.
And now let’s pass on to how you can control your website crawling and indexing.
By default, if you do not have any technical SEO files with crawl controls, search bots will still visit your site and crawl it as it is. However, technical files let you control how search engine bots crawl and index your pages, so they are highly recommended if your site is large. Below are a few ways to modify indexation/crawling rules:
So, how to make Google index your site faster using each of them?
A Sitemap is a technical SEO file that lists all pages, videos, and other resources on your site, as well as the relationships between them. The file tells search engines how to crawl your site more efficiently and plays a crucial role in your website accessibility.
A website needs a Sitemap when:
There are different types of sitemaps you may want to add to your site, depending mostly on the type of the website you manage.
An HTML sitemap is intended for human readers and is located at the bottom of the website. It has little SEO value, though. An HTML sitemap shows the primary navigation to people and usually replicates the links in site headers. Meantime, HTML sitemaps can be used to enhance accessibility for pages that are not included in the main menu.
Contrary to HTML sitemaps, XML sitemaps are machine-readable thanks to a special syntax. The XML Sitemap lies in the root domain, for example, https://www.link-assistant.com/sitemap.xml. Further below, we’ll discuss the requirements and markup tags for creating a correct XML sitemap.
This is an alternative kind of sitemap available for search engine bots. The TXT sitemap simply lists all website URLs, without providing any other information about the content.
This type of sitemaps is helpful for vast image libraries and large-sized images to help them rank in Google Image Search. In the Image Sitemap, you can provide additional information about the image, such as geo-location, title, and license. You can list up to 1,000 images for each page.
Video Sitemaps are needed for video content hosted on your pages to help it rank better in Google Video Search. Although Google recommends using structured data for videos, a sitemap can also be beneficial, especially when you have a lot of video content on a page. In the Video Sitemap, you can add extra information about the video, such as titles, description, duration, thumbnails, and even if it’s family-friendly for Safe Search.
For multilingual and multiregional websites, there are several ways for search engines to determine which language version to serve in a certain location. Hreflangs are one of the several ways to serve localized pages, and you can use a special hreflang sitemap for that. The hreflang sitemap lists the URL itself together with its child element indicating language/region code for the page.
If you run a news blog, adding a News-XML Sitemap may impact your rankings positively on Google News. Here, you add information about the title, the language, and the publication date. You can add up to 1,000 URLs in the News Sitemap. The URLs should be no older than two days, after which you can delete them, but they will stay in the index for 30 days.
If your website has an RSS feed, you can submit the feed URL as a sitemap. Most blog software is capable of creating a feed, but this information is helpful only for the quick discovery of recent URLs.
Nowadays, the most frequently used are XML sitemaps, so let's briefly revise the main requirements for XML sitemap generation:
The XML sitemap is UTF-8 encoded and contains mandatory tags for an XML element:
A simple example of a one-entry XML sitemap will look like
There are optional tags to indicate the priority and frequency of page crawls – <priority>, <changefreq> (Google currently ignores them), and <lastmod> value when it’s accurate (for example, as compared to the last modification on a page).
A typical error with sitemaps is not having a valid XML sitemap on a large domain. You can check the presence of a sitemap on yours with WebSite Auditor. Find the results in the Site audit > Indexing and crawlability section.
If you don't have a sitemap, you should really go and create one right now. You can quickly generate the sitemap using WebSite Auditor’s Website Tools when you switch to the Pages section.
And let Google know about your sitemap. To do this, you can
The fact is, having a sitemap on your website does not guarantee that all your pages will be indexed or even crawled. There are some other technical SEO resources, aimed at improving site indexation. We’ll review them in the next steps.
A robots.txt file tells search engines which URLs the crawler can access on your site. This file serves to avoid overloading your server with requests, managing crawl traffic. The file is typically used to:
Robots.txt is placed in the root of the domain, and each subdomain must have a separate file of its own. Mind that it should not exceed 500kB and should respond with a 200 code.
The robots.txt file also has its syntax with Allow and Disallow rules:
Different search engines may follow the directives differently. For instance, Google abandoned using the directives noindex, crawl-delay, and nofollow from robots.txt. Besides, there are special crawlers like Googlebot-Image, Bingbot, Baiduspider-image, DuckDuckBot, AhrefsBot, etc. So, you can define the rules for all search bots or separate rules for only some of them.
Writing instructions for robots.txt may become quite tricky, so the rule here is to have fewer instructions and more common sense. Below are a few examples of setting the robots.txt instructions.
Full access to the domain. In this case, the disallow rule is not filled in.
Full blocking of a host.
The instruction disallows crawling all URLs starting with upload after the domain name.
The instruction disallows Googlebot-News to crawl all gif files in the news folder.
Keep in mind that if you set some general instruction A for all search engines and one narrow instruction B for a specific bot, then the specific bot may follow the narrow instruction and perform all other general rules as set by default for the bot, as it won’t be restricted by the rule A. For example, like in the rule below:
Here, AdsBot-Google-Mobile may crawl files in the tmp folder despite the instruction with the wildcard * mark.
One of the typical uses of the robots.txt files is to indicate where the Sitemap rests. In this case, you do not need to mention user agents, as the rule applies to all crawlers. Sitemap should start with the capitalized S (remember that robots.txt file is case-sensitive), and the URL has to be absolute (i.e., it should start with the full domain name).
Bear in mind that if you set contradictory instructions, crawler bots will give priority to the longer instruction. For example:
Here, the script /admin/js/global.js will still be allowed for crawlers despite the first instruction. All other files in the admin folder will still be disallowed.
You can check the availability of the robots.txt file in WebSite Auditor. It also lets you generate the file using the robots.txt generator tool, with further saving or uploading it straight to the website via FTP.
Be aware that the robots.txt file is publicly available, and it may expose some pages instead of hiding them. If you want to hide some private folders, make them password-protected.
Finally, the robots.txt file does not guarantee that the disallowed page won’t be crawled or indexed. Blocking Google from crawling a page is likely to remove it from Google's index, however, the search bot still may crawl the page following some backlinks pointing to it. So, here is another way to block a page from crawling and indexing — meta robots.
Meta robots tags are a great way to instruct crawlers how to treat individual pages. Meta robots tags are added to the <head> section of your HTML page, thus the instructions are applicable to the whole page. You can create multiple instructions by combining robots meta tag directives with commas or by using multiple meta tags. It may look like this:
You can specify meta robots tags for various crawlers, for example
Google understands such tags as:
The opposite tags index / follow / archive override the corresponding prohibiting directives. There are some other tags telling how the page may appear in search results, such as snippet / nosnippet / notranslate / nopagereadaloud / noimageindex.
If you use some other tags valid for other search engines but unknown to Google, Googlebot will simply ignore them.
Instead of meta tags, you can use a response header for non-HTML resources, such as PDFs, video and image files. Set to return an X-Robots-Tag header with a value of either noindex or none in your response.
You can also use a combination of directives to define what the snippet will look like in search results, for example, max-image-preview: [setting] or nosnippet or max-snippet: [number], etc.
You can add the X-Robots-Tag to a website's HTTP responses through the configuration files of your site's web server software. Your crawling directives can be applied globally across the site for all files, as well as for individual files if you define their exact names.
You can quickly review all robots instructions with WebSite Auditor. Go to Site Structure > All Resources > Internal Resources and check the Robots’ Instructions column. Here you will find the disallowed pages and which method is applied, robots.txt, meta tags, or X-Robots-tag.
The server hosting a site generates an HTTP status code when responding to a request made by a client, browser, or crawler. If the server responds with a 2xx status code, the content received may be considered for indexing. Other responses from 3xx to 5xx indicate there is an issue with content rendering. Here are some meanings of the HTTP status code responses:
301 redirects are used when:
302 temporary redirect
The temporary 302 redirect should be used only on temporary pages. For example, when you are redesigning a page or testing a new page and collecting feedback, but don’t want the URL to drop from rankings.
304 to check cache
304 response code is supported in all most popular search engines, like Google, Bing, Baidu, Yandex, etc. The correct setup of the 304 response code helps the bot understand what has changed on the page since its last crawl. The bot sends an HTTP request If-Modified-Since. If no changes are detected since the last crawl date, then the search bot does not need to re-crawl the page. For a user it means that the page won’t be fully re-loaded, and its contents will be taken from the browser cache.
The 304 code also helps to:
It is important to check the caching of not only the content of the page, but also static files, like images or CSS styles. There are special tools, like this one, to check the 304 response code.


Most often, server response code issues appear when crawlers keep following the internal and external links to the deleted or moved pages, getting 3xx and 4xx responses.
A 404 error shows that a page is not available and the server sends the correct HTTP status code to the browser — a 404 Not Found.
However, there are soft 404 errors when the server sends the 200 OK response code, but Google considers it should be 404. This can happen because:
In WebSite Auditor’s Site Audit module, review the resources with 4xx, 5xx response code under the Indexing and Crawlability tab, and a separate section for broken links in the Links tab.
Some other common redirect issues involving 301/302 responses:
You can review all pages with 301 and 302 redirects in the Site Audit > Redirects section of WebSite Auditor.
Duplication may become a severe issue for website crawling. If Google finds duplicate URLs, it will decide which of them is a primary page and will crawl it more frequently, while the duplicates will be crawled less often, and may fall out of the search index at all. A surefire solution is to indicate one of the duplicate pages as canonical, the main one. This can be done with the help of the rel=”canonical” attribute, placed in the pages’ HTML code or a site’s HTTP header responses.
Google uses canonical pages to assess your content and quality, and most often, search results link to canonical pages, unless the search engines distinctly identify that some non-canonical page is better suited for the user (for example, it is a mobile user or a searcher in a specific location).
Thus, canonicalization of relevant pages helps to:
Duplicate issues mean identical or similar content appearing on several URLs. Pretty often, duplications appear automatically because of technical data handling on a website.
Some CMSs may automatically generate duplicate issues because of the wrong settings. For example, multiple URLs may be generated in various website directories, and these are duplicates:
Pagination may also cause duplication issues if implemented incorrectly. For example, the URL for the category page and page 1 show the same content and thus are treated as duplicates. Such combination should not exist, or the category page should be marked as canonical.
Sorting and filtering results may be represented as duplicates. This happens when your site creates dynamic URLs for search or filtering queries. You will get URL parameters that represent aliases of query strings or URL variables, these are the part of a URL that follows a question mark.
To stop Google from crawling a bunch of nearly identical pages, set to ignore certain URL parameters. To do that, launch Google Search Console and go to Legacy tools and reports > URL Parameters. Click Edit on the right and tell Google which parameters to ignore — the rule will apply sitewide. Mind that the Parameter Tool is for advanced users, so it should be handled accurately.


The duplication issue often happens on e-commerce websites that allow faceted filter navigation, narrowing the search to three, four, and more criteria. Here is an example of how to set up crawling rules for an e-commerce site: store URLs with longer, narrower search results in a specific folder and disallow it by a robots.txt rule.
Logical issues in website structure may cause duplication. This can be a case when you’re selling products and one product belongs to different categories.
In this case, the products have to be accessible via only one URL. The URLs are regarded as full duplicates and will harm SEO. The URL has to be assigned through the correct settings of the CMS, generating a unique single URL for one page.
Partial duplication often happens with WordPress CMS, for example, when tags are used. While tags improve site search and user navigation,WP websites generate Tag pages that may coincide with the category names and represent similar content from article snippet preview. The solution is to use tags wisely, adding only a limited number of them. Or you can add a meta robots noindex dofollow on tag pages.
If you choose to serve a separate mobile version of your website, and, in particular, generate AMP pages for mobile search, you may have duplicates of this kind.
To indicate that a page is a duplicate, you can use a <link> tag in the head section of your HTML. For mobile versions, this will be the link tag with the rel=“alternate” value, like this:
The same applies to AMP pages, (which are not the trend, but still can be used to render mobile results.), Have a look at our guide on implementation of AMP pages.
There are various ways to present localized content. When you present content to different language/locale variants, and you’ve translated only the header/footer/navigation of the site, but the content stays in the same language, the URLs will be treated as duplicates.
Set up showing multilingual and multiregional sites with the help of hreflang tags, adding the supported language/region codes in the HTML, HTTP response codes, or in the sitemap.
Websites are usually available with and without "www" in the domain name. This issue is quite common, and people link to both www and non-www versions. Fixing this will help you prevent search engines from indexing two versions of a website. Although such indexation won't cause a penalty, setting one version as a priority is a best practice.
Google prefers HTTPS to HTTP since secure encryption is highly recommended for most websites (especially when taking transactions and collecting sensitive user information.) Sometimes, webmasters face technical issues when installing SSL certificates and setting up the HTTP/HTTPS versions of the website. If a site has an invalid SSL certificate (untrusted or expired one), most Web browsers will prevent users from visiting your site by notifying them of an "insecure connection".
If the HTTP and HTTPS versions of your website are not set properly, both of them can get indexed by search engines and cause duplicate content issues that may undermine your website rankings.
If your site is already using HTTPS (either partially or entirely), it is important to eliminate common HTTPS issues as part of your SEO site audit. In particular, remember to check for mixed content in the Site Audit > Encoding and technical factors section.
Mixed content issues arise when an otherwise secure page loads some of its content (images, videos, scripts, CSS files) over a non-secure HTTP connection. This weakens the security and might prevent browsers from loading the non-secure content or even the entire page.
To avoid these issues, you can set up and view the primary www or non-www version for your site in the .htaccess file. Also, set the preferred domain in Google Search Console, and indicate HTTPS pages as canonical.
Once you are in full control of content on your own website, ensure that there are no duplicate titles, headings, descriptions, images, etc. For a hint on duplicate content sitewide, see the On-page section in WebSite Auditor's Site Audit dashboard. The pages with duplicate titles and meta description tags are likely to have nearly identical content as well.
Let's summarize how we discover and fix indexation issues. If you’ve followed all the above tips, but some of your pages are still not in the index, here’s a recap of why this could have happened:
Why a page is indexed, although it shouldn’t be?
Keep in mind that blocking a page in the robots.txt file and removing it from the sitemap does not guarantee that it won’t be indexed. You can consult our detailed guide on how to restrict pages from indexing correctly.
Shallow, logical site architecture is important for both users and search engine bots. A well-planned site structure also plays a great role in its rankings because:
When reviewing your sites’ structure and internal linking, pay attention to the following elements.
Optimized URLs are crucial for two reasons. First, it’s a minor ranking factor to Google. Second, users may be confused by too-long or clumsy URLs. Thinking of your URL structure, stick to the following best practices:
You can check your URLs in WebSite Auditor’s Site Audit > URLs section.
There are a lot of link types, some of them are more or less beneficial to your website SEO. For example, dofollow contextual links pass the link juice and serve as an additional indicator to search engines what the link is about. Links are considered to be of high quality when (and this refers to both internal and external links):
Navigation links in headers and sidebars are also important for website SEO, as they help users and search engines navigate through the pages.
Other links may bear no ranking value or even harm a site authority. For example, massive sitewide outgoing links in templates (which free WP templates used to have a lot). This guide on the types of links in SEO tells how to build valuable links the right way.
You can use WebSite Auditor tool to thoroughly examine internal links and their quality.
Orphan pages are unlinked pages that go unnoticed and finally may fall out of the search index. To find orphan pages, go to Site Audit > Visualization, and review the visual sitemap. Here you will easily see all the unlinked pages and long redirect chains (301 and 302 redirects are marked in blue).


You can overview the whole site structure, examine the weight of its main pages — by checking pageviews (integrated from Google Analytics), PageRank, and the link juice they get from incoming and outgoing links. You can add and remove links and rebuild the project, recalculating the prominence of each page.


As you audit your internal links, check the click depth. Make sure your site's important pages are no more than three clicks away from the homepage. Another place to review the click depth in WebSite Auditor is to jump to Site Structure > Pages. Then sort the URLs by Click depth in descending order by clicking on the header of the column twice.
Pagination of blog pages is necessary for discoverability by search engines, though it increases the click depth. Use simple structure along with actionable site search to make it easier for users to find any resource.
For more details, please refer to our detailed guide to SEO-friendly pagination.
Breadcrumb is a markup type that help create rich results in search, showing the path to the page within the structure of your site. Breadcrumbs appear thanks to proper linking, with optimized anchors on internal links, and correctly implemented structured data (we’ll dwell on the latter a few paragraphs below).


In fact, internal linking may affect your site ranking and the way each page is presented in search. To learn more, consult our SEO guide to internal linking strategies.
Site speed and page experience directly impact organic positions. Server response may become an issue to site performance when too many users visit it at a time. As for page speed, Google expects the largest page content to load within the viewport in 2.5 seconds or less, and eventually rewards pages delivering better results. That is why speed should be tested and improved on both the server and client side.
Load speed testing discovers server-side issues when too many users visit a website simultaneously. Although the issue is related to server settings, SEOs should take it into account before planning large-scale SEO and advertising campaigns. Test your server load maximum capacity if you expect an upsurge in visitors. Pay attention to the correlation between the rise of visitors and server response time. There are load testing tools that let you simulate numerous distributed visits and crash-test your server capacity.
On the server side, one of the most important metrics is the TTFB measurement, or time to first byte. TTFB measures the duration from the user making an HTTP request to the first byte of the page being received by the client's browser. The server response time affects the performance of your web pages. TTFB audit fails if the browser waits longer than 600 ms for the server to respond. Note that the easiest way to improve TTFB is switching from shared hosting to managed hosting, as in this case you'll have a dedicated server for your site only.
For example, here is a page test made withGeekflare — a free tool to check the site performance. As you can see, the tool shows that TTFB for this page exceeds 600ms, thus should be improved.


On the client side, page speed is not an easy thing to measure, though, and Google has struggled with this metric for a long time. Finally, it has arrived at Core Web Vitals — three metrics designed to measure the perceived speed of any given page. These metrics are Largest Contentful Pain (LCP), First Input Delay (FID), and Cumulative Layout Shift (CLS). They show the performance of a website regarding loading speed, interactivity, and visual stability of its web pages. If you need more details about each CWV metric, check out our guide on Core Web Vitals.


Recently, all three Core Web Vitals metrics have been added to WebSite Auditor. So, if you are using this tool, you can see each metric score, a list of page speed issues on your website, and a list of affected pages or resources. The data are analyzed via the PageSpeed API key that can be generated free.
The benefit of using WebSite Auditor to audit CWV is that you perform a bulk check for all the pages at a time. If you see many pages affected by the same issue, it’s likely the issue is sitewide and can be resolved with a single fix. So it’s actually not as much work as it seems. All you have to do is follow the recommendations on the right, and your page speed will be up in no time.
Nowadays, the number of mobile searchers surpasses those from desktops. In 2019, Google implemented mobile-first indexing, with the smartphone agent crawling websites ahead of Googlebot desktop. So, mobile-friendliness bears paramount importance for organic rankings.
Remarkably, there are different approaches to creating mobile-friendly websites:
The pros and cons of each solution are explained in our detailed guide on how to make your website mobile-friendly. Plus you can brush up on AMP pages — although this is not a cutting-edge technology, it still works well for some types of pages, e.g., for news.
Mobile-friendliness stays a vital factor for the websites serving one URL for both desktops and mobiles. Besides, some usability signals, such as the absence of intrusive interstitials, stay a relevant factor for both desktop and mobile rankings. That’s why web developers should ensure the best user experience on all types of devices.
Google's mobile-friendly test includes a selection of usability criteria, such as viewport configuration, use of plugins, and the size of text and clickable elements. It's also important to remember that mobile-friendliness is assessed on a page basis, so you'd need to check each of your landing pages for mobile-friendliness separately, one at a time.
To assess your entire website, switch to Google Search Console. Go to the Experience tab and click the Mobile Usability report to see the stats for all of your pages. Under the graph you can see a table with the most common issues affecting your mobile pages. By clicking on any issue below the dashboard, you will get a list of all affected URLs.


Typical mobile-friendliness issues are:
WebSite Auditor also reviews the mobile-friendliness of the homepage and points to issues in mobile user experience. Go to Site Audit > Encoding and Technical Factors. The tool will show if the site is mobile-friendly, and will list issues, if any:
On-page signals are direct ranking factors and, no matter how good your website’s technical soundness is, your pages will never show up in search without proper HTML tags optimization. So your goal is to check and tidy up the titles, meta descriptions, and H1–H3 headings of your content across your website.
The title and meta description are used by search engines to form a search result snippet. This snippet is what users will see first, thus it greatly affects the organic click-through rate.
Headings, together with paragraphs, bulleted lists, and other webpage structure elements, help create rich search results in Google. Moreover, they naturally improve readability and user interaction with the page, which may serve as a positive signal to search engines. Keep an eye on:
Duplicate titles, headings, and descriptions sitewide — fix them by writing unique ones for each page.
Optimization of the titles, headings, and descriptions for search engines (i.e. the length, keywords, etc.)
Thin content — pages with little content will hardly ever rank and even may spoil the site authority (because of the Panda algorithm), so make sure your pages cover the subject in-depth.
Optimization of images and multimedia files — use SEO-friendly formats, apply lazy-loading, resize the files to make them lighter, etc. For more detail, read our guide on image optimization.
WebSite Auditor can help you a lot with this task. The Site Structure > Site Audit section lets you check the meta tags issues across the website in bulk. If you need to audit the individual page’s content in more detail, go to the Page Audit section. The app also has an in-built writing tool Content Editor that offers you suggestions on how to re-write pages based on your top SERP competitors. You can edit the pages on the go or download the recommendations as a task for copywriters.
For more information, read our on-page SEO optimization guide.
Structured data is a semantic markup that lets search bots better understand a page’s content. For example, if your page features an apple pie recipe, you can use structured data to tell Google which text is the ingredients, which is cooking time, calorie count, and so forth. Google uses the markup to create rich snippets for your pages in SERPs.


There are two popular standards of structured data, OpenGraph for beautiful sharing on social media and Schema for search engines. The variants of the markup implementation are the following: Microdata, RDFa, and JSON-LD. Microdata and RDFa are added to the page’s HTML, whereas JSON-LD is a JavaScript code. The latter is recommended by Google.
If your page’s content type is one of the mentioned below, then the markup is especially recommended:
Mind that manipulating structured data may cause penalties from search engines. For example, the markup should not describe the content that is hidden from users (i.e. which is not located in the HTML of the page). Test your markup with the Structured Data Testing Tool before implementation.
You can also check your markup in Google Search Console under the Enhancements tab. GSC will display the enhancements you’ve tried to implement on your website and tell you if you’ve succeeded.


WebSite Auditor can also help you here. The tool can review all your pages and show the presence of structured data on a page, its type, titles, descriptions, and URLs of OpenGraph files.
If you haven’t implemented Schema markup yet, check this SEO guide on structured data. Note that if your website is using a CMS, structured data may be implemented by default, or you could add it by installing a plugin (don’t overdo with plugins anyway).
Once you audit your website and fix all the discovered issues, you can ask Google to recrawl your pages to make it see the changes quicker.
In Google Search Console, submit the updated URL to the URL inspection tool and click Request indexing. You can also leverage the Test Live URL feature (previously known as the Fetch as Google feature) to see your page in its current form, and then request indexing.


The URL inspection tool allows expanding the report for more details, testing live URLs, and requesting indexing.
Keep in mind that you don’t actually need to force recrawling any time you change something on your website. Consider recrawling if the changes are serious: say, you moved your site from http to https, added structured data or did some great content optimization, released an urgent blog post you want to appear on Google quicker, etc. Note that Google has a limit on the number of recrawl actions per month, so don’t abuse it. What’s more, most CMS submit any changes to Google as soon as you make them, so you may not bother with recrawling if you use a CMS (like Shopify or WordPress).
Recrawling may take from a few days to several weeks, depending on how often the crawler visits the pages. Requesting a recrawl multiple times will not speed the process up. If you need to recrawl a massive amount of URLs, submit a sitemap instead of manually adding each URL to the URL inspection tool.
The same option is available in Bing Webmaster Tools. Just choose the Configure My Site section in your dashboard and click on Submit URLs. Fill in the URL you need re-indexed, and Bing will crawl it within minutes. The tool allows webmasters to submit up to 10,000 URLs per day for most sites.
Many things can happen on the web, and most of them are likely to affect your rankings better or worse. That’s why regular technical audits of your website should be an essential part of your SEO strategy.
For example, you can automate technical SEO audits in WebSite Auditor. Just create a Rebuild Project task and set the schedule settings (say, once a month) to have your website automatically recrawled by the tool and get the fresh data.
If you need to share the results of the audit with your clients or colleagues, choose one of the WebSite Auditor’s downloadable SEO reporting templates or create a custom one.


The Site Audit (Summary) template is great for website editors to see the scope of optimization work to do. The Site Audit (Details) template is more explanatory, describing each issue and why it’s important to fix it. In Website Auditor, you can customize the site audit report to get the data you need to monitor regularly (indexing, broken links, on-page, etc.) Then, export as a CSV/PDF or copypaste any data into a spreadsheet to hand it over to developers for fixes.
Moreover, you can get a full list of technical SEO issues on any website gathered automatically in a Site Audit report in our WebSite Auditor. On top of that, a detailed report will provide explanations on each issue and how to fix it.
These are the basic steps of a regular technical site audit. I hope that the guide in the best way describes what tools you need to conduct a thorough site audit, what SEO aspects to look after, and what preventive measures to take to maintain a good SEO health of your website.
What is technical SEO?
Technical SEO deals with the optimization of technical aspects of a website that help search bots access your pages more effectively. Technical SEO covers crawling, indexing, server-side issues, page experience, generating meta tags, site structure.
How do you conduct a technical SEO audit?
Technical SEO audit starts from collecting all the URLs and analyzing your website’s overall structure. Then you check the pages’ accessibility, loading speed, tags, on-page details, etc. The technical SEO audit tools range from free webmaster tools to SEO spiders, log file analyzers, etc.
When do I need to audit my site?
Technical SEO audits may pursue different goals. You may want to audit a website before launch or during the ongoing optimization process. In other cases, you may be implementing site migrations or want to lift Google sanctions. For each case, the scope and methods of technical audits will differ.